2m. Band
This chapter descibes all kind of developments that I have gone through the past couple of years for the 144MHz band. Many projects have been closed succesfully, others have been closed prior due to not being of interrest anymore or others ideas found of better match to the need.
Almost all subjects have as far as possible being photographed. This enables me to make things more clearer to the reader. In case things are not fully clear, please take some time to ask additional information by using the e-mail address found under "contact me". I will then try the clear things out as soon as possible.
144MHz tranceiver:
My first all-mode 144MHz tranceiver was a Kenwood TR9130, completed with basestand and external speaker. This tranceiver I still use for local QSO's in FM, but also is in service for my 13cm transverter that is described in another page on this web-side.
My current 144MHz station uses a Kenwood TS711e transceiver, modified to use seperated TX and RX cabling. Because of long cabling between transceiver and antenna, and the need to have a sensitive receiption, there is a PreAmp mounted close to the antenna. This consists of a PA3BIY High IP PreAmp, that gives very low noise in a setup using a HEMT FET.
144MHz Preamp:
 I have used another low noise PreAmp for a
long time, this was a wellknown design done by DJ9BV. This PreAmp served good service for many years, but due to some other HAM's in my neighborhood also building this PreAmp, I decided to join them and also try this design.
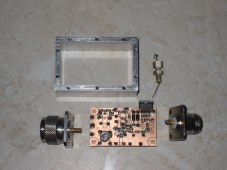
In the picture to the right is the PA3BIY PreAmp shown during assembly phase in an aluminum housing. Follow the link at the left to retrieve more information on building the PreAmp in this small style.
Need QRO?
The normal output power from the TS711e is only 25Watt. For local traffic this is sufficient, but for more serious tropo DX or Meteor Scatter (MS), this needs a bit more bite. That is were the help of an additional amplifier is needed. I have used for DX a power amplifier that uses a single 4CX250b, however this tube needs a good ventilation to ensure operation also over extended periods and during warm summer days. Some pictures of this amplifier will be presented in the link to the left that descibes 'Other interrests'.
144MHz Power Amplifier:
 My current 144MHz amplifier is build around the russian GS35b.This tube is fitted in a cavity that has nicely been descibed by DJ5RE. Please read carefully my notes after following the link meantioned above, as there are some adaptions needed to the original design! For more details click the link at the left. My current 144MHz amplifier is build around the russian GS35b.This tube is fitted in a cavity that has nicely been descibed by DJ5RE. Please read carefully my notes after following the link meantioned above, as there are some adaptions needed to the original design! For more details click the link at the left.This GS35b tube is supplied by means of a dedicaded GS35b Power-Supply (see link at the left). This PSU is build from components that is a mix of newly purchased and components found on different HAM-fests. Looking for the right components, not only for the PSU, but also for the GS35b Cavity can take sometimes over half a year. Completing such a 144MHz amplifier takes upto one year if one is not willing to build up using only new purchased components.
144MHz Antenna:
My current 144MHz antenna consists of a 4.02 wavelength, 13 element antenna. Prior to this antenna that is installed in summer 2007, I worked for over 15 years with an 16 el. F9FT antenna. This 6.30 meter long yagi was damaged couple of times and was at the end of it's lifetime. I looked over the internet and found in the VE7BQH list of 144MHz antenna's this 2SA13 design. Compared to similar boomlength antenna's this antenna stood out in gain. Below is the performace shown as can also be found in the VE7BQH G/T table for a 4-stack:
For building this antenna a study needed to be done to get the right metric numbers. In the link to the 2SA13 at the left, this is explained in detail, were also some pictures and dimensions are shown for the practical builder. For the more advanged builder that want to use his own choise material, also the way to
correct for other boom-material is given according the SM5BSZ boom_calculation method which Leif decribes in detail on his internet pages.
|